
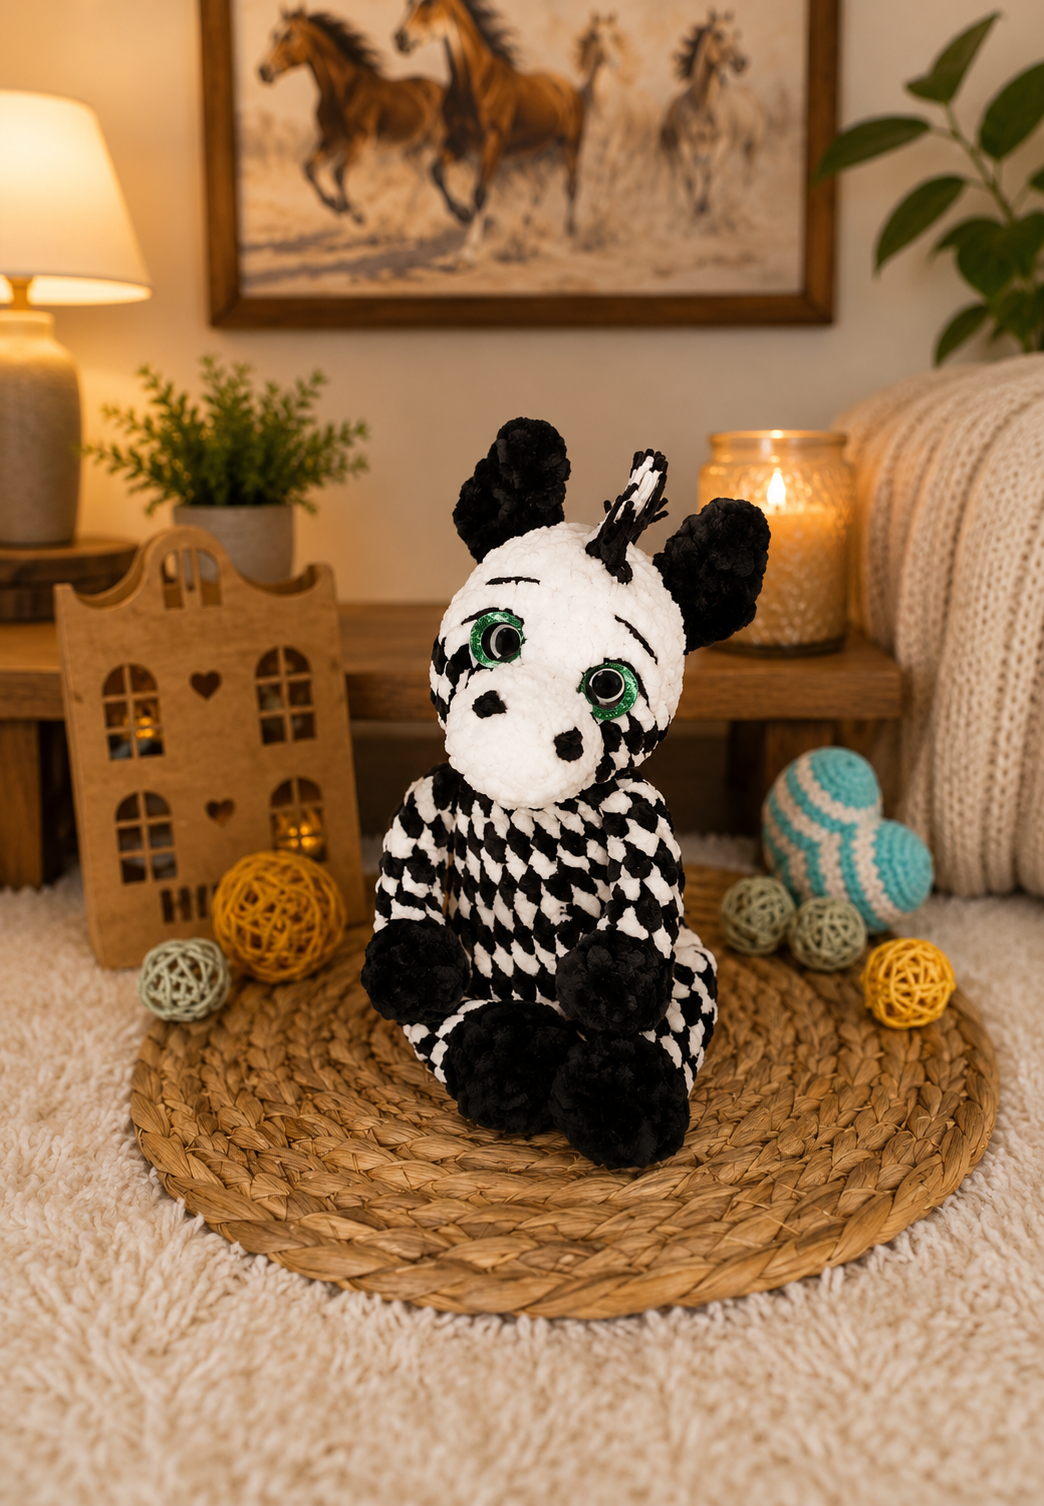
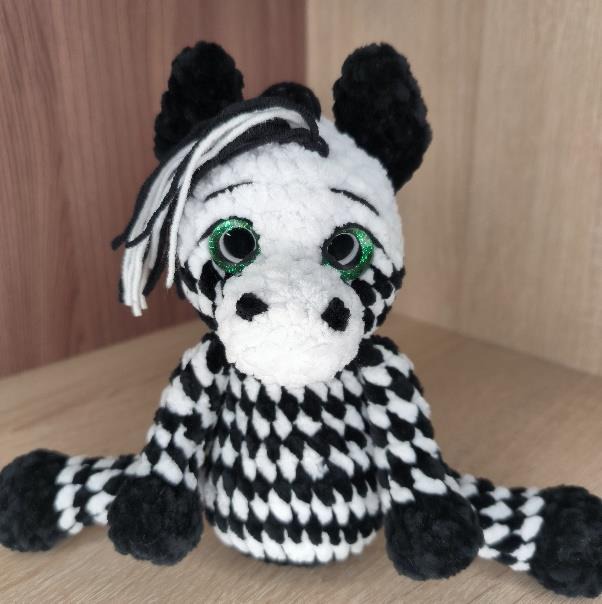
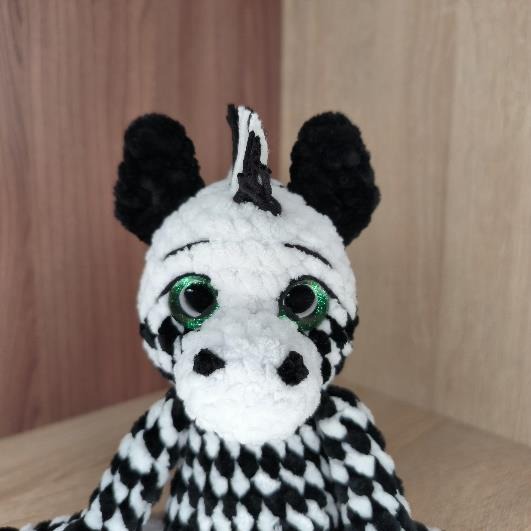
Say hello to the newest member of the herd — a playful little zebra with a bold houndstooth-style black-and-white body, a spiky mane, and the same sweet face as the free horse amigurumi pattern. This one is all about the two-color technique — every single round alternates black and white to create that classic zebra print, no colorwork charts required.
This is a bonus/companion pattern — the ears and muzzle are made exactly the same way as the horse pattern. Below, I’m sharing everything that’s specific to the zebra: the two-color legs, arms, body and head, plus the black-and-white fringe mane and tail.
What You’ll Need
- Velvet/chenille yarn in black and white (crochet the entire toy with a 3.5 mm hook)
- YarnArt Jeans yarn in white and black, for the fringe mane and tail
- Safety eyes (green shown in the photos, but any color works)
- Fiberfill stuffing
- Stitch markers, scissors, yarn needle
- Optional: PVA glue, if you want the mane to stand extra upright
Crochet the ears (“Yuki”) and muzzle exactly according to the horse pattern. Everything below is specific to the zebra’s two-color body.
Pattern Instructions
Legs (make 2)
Work in black yarn:
- 6 sc in MR (6)
- 6 inc (12)
- 12 sc in BLO (12)
- 12 sc in both loops (12)
- (2 sc, dec) *3 (9)
Stuff lightly up to Round 5, then DO NOT STUFF AT ALL! Change to white yarn; do not cut the black yarn — you’ll be alternating rows.
- White: 9 sc in BLO (9)
- Black: 9 sc in both loops (9)
- White: 9 sc (9)
- Black: 9 sc (9)
- White: 9 sc (9)
- Black: 9 sc (9)
- White: dec, 7 sc (8)
Cut the white yarn, fasten off, and weave the end inside the piece. Continue crocheting with black yarn. Work the offset stitches (+5 sc) so the piece finishes straight on the side opposite the color change. Fold the piece in half and crochet 4 sc. Join with a sl st, cut the yarn, and weave the end inside the piece.

Arms (make 2)
Work in black yarn:
- 6 sc in MR (6)
- 6 inc (12)
- 12 sc in BLO (12)
- 6 dec (6)
Stuff lightly up to Round 4, then DO NOT STUFF AT ALL! Change to white yarn; do not cut the black yarn.
- White: 6 sc in BLO (6)
- Black: 6 sc in both loops (6)
- White: 6 sc (6)
- Black: 6 sc (6)
- White: 6 sc (6)
- Black: 6 sc (6)
- White: 6 sc (6)
Cut the white yarn, fasten off, and weave the end inside the piece. Continue crocheting with black yarn. Work the offset stitches (+4 sl sts) so you finish on the side opposite the color change. Fold the piece in half and crochet 3 sc. Join with a sl st, cut the yarn, and weave the remaining tail inside the piece.

Body
Work in black yarn:
- 6 sc in MR (6)
- 6 inc (12)
- (1 sc, inc) *6 (18)
- (2 sc, inc) *6 (24)
Change to white yarn; do not cut the black yarn.
- White: (3 sc, inc) *6 (30)
- White: 30 sc (30)
In round 7, we crochet the legs onto the body:
- White: 6 sc, 4 sc worked together through the loops of the leg and body (color change at the BACK of the zebra!), 10 sc, 4 sc worked together through the loops of the leg and body (color change at the BACK!), 6 sc (30)

- White: 30 sc (30)
- Black: (3 sc, dec) *6 (24)
- White: 24 sc (24) — if necessary, even out the round (+1 stitch)
- Black: (4 sc, dec) *4 (20)
- White: 20 sc (20)
- Black: 20 sc (20)
- White: (dec, 8 sc) *2 (18)
Stuff the body very firmly.
In round 15, work in the arms. If necessary, even out the marker at the back, in the middle of the back (+1 stitch).
- Black: 3 sc, 3 sc worked together with the loops of the arm and body (color change at the BACK!), 5 sc, 3 sc worked together with the loops of the arm and body (color change at the BACK!), 4 sc (18)
- White: (1 sc, dec) *6 (12)
Stuff the body very firmly. DO NOT CUT THE YARN. Continue crocheting the head.

Head
- Black: (1 sc, inc) *6 (18)
- White: (2 sc, inc) *6 (24)
- Black: (3 sc, inc) *6 (30)
- White: 30 sc (30)
- Black: 30 sc (30)
- White: 30 sc (30)
Cut the black yarn, fasten off, and weave the end inside the piece.
- 7–10) 30 sc (4 rounds) (30)
Adjust the marker to the middle of the back of the head (+2 stitches).
- (3 sc, dec) *6 (24)
Before inserting the eyes, stuff the head so you don’t make a mistake with placement. Insert the eyes between Rounds 8 and 9, with 6 sc between the eye posts. Stuff the head and neck very firmly.
- (2 sc, dec) *6 (18)
- (1 sc, dec) *6 (12)
Stuff the head very firmly.
- 6 dec (6)
Make a slip stitch, cut the yarn, close the opening completely using a needle, and weave the yarn end inside the piece.

Finishing and Decoration
The mane and all finishing details (eyes, eyebrows, sewing on the muzzle and ears) are made according to the horse pattern. For the tail and mane, use YarnArt Jeans yarn in white and black.
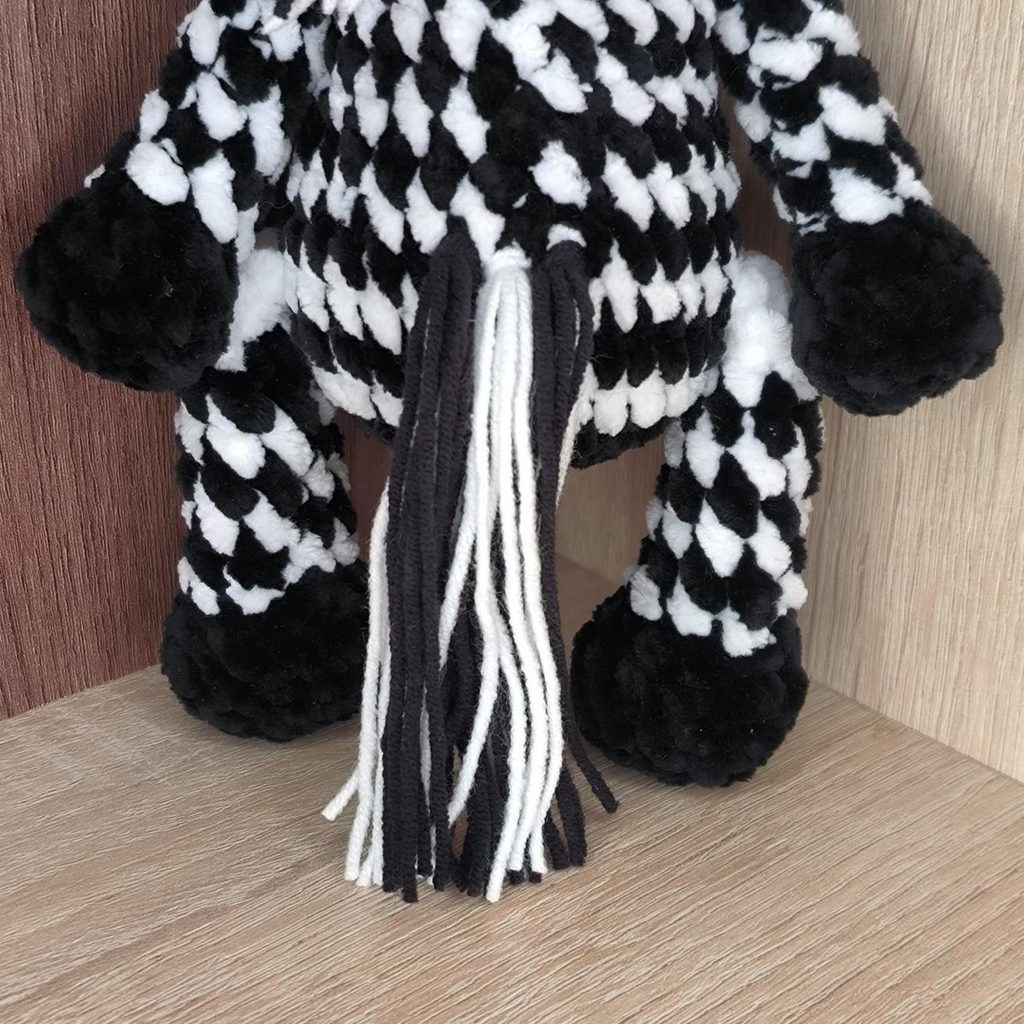
Tail
Prepare 9 strands of each color, approximately 20 cm long. Attach 3 strands of one color to each stitch (using the same attachment method as for the horse’s tail):
- Lower row: white – black – white
- Upper row: black – white – black
Trim the tail to the desired length using scissors.
Mane
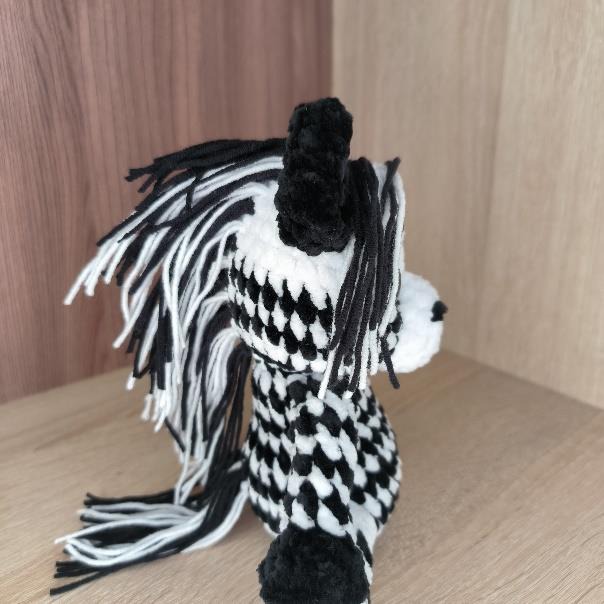
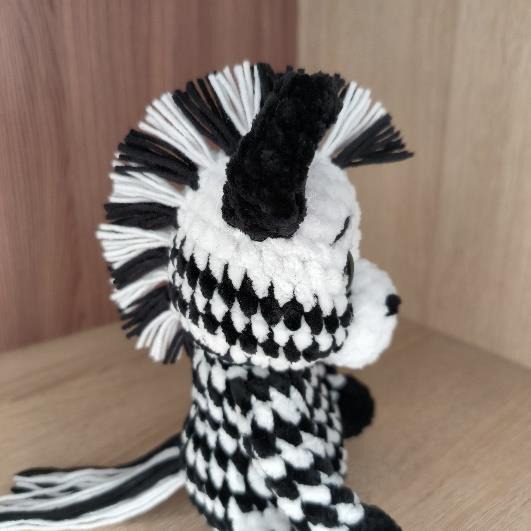
Prepare approximately 32 white strands and 36 black strands, each about 15 cm long. Start attaching the mane from top to bottom (as with a real zebra) in two parallel rows, using two strands in each stitch.
- The first attachment point is between the 12th and 13th rounds of the head (or the 4th round above eye level), exactly opposite the eyes.
- The last attachment point is on the first round at the back of the head (the transition from the body).
Attention! The rows must alternate by color from top to bottom: black – white – black – white — and so on.
Trim the mane to the desired length with scissors. For the mane to stand upright on its own, leave approximately 2–2.5 cm of length for each strand. If it still doesn’t stand upright at that length, carefully coat each strand with PVA glue and let it dry completely — the mane will become stiff and always remain upright. (The designer didn’t need glue for their version!)
Tips for a Polished Finish
- Keep your color changes at the back — every single instruction in this pattern reminds you to change color at the back of the piece, and it really does keep the front looking clean and graphic.
- Don’t cut the yarn between color changes — carrying the unused color up the inside of the piece (rather than cutting and rejoining every round) keeps your tension even and saves a lot of weaving in ends.
- Count your rounds carefully — since the stripe pattern is what creates the houndstooth look, losing track of black vs. white rounds is the easiest mistake to make. A row counter helps a lot here.
- Trim the mane gradually — cut a little, stand the zebra up, check if it holds — repeat rather than committing to one length all at once.
Frequently Asked Questions
Do I need the horse pattern to make this zebra?
Yes — the ears and muzzle instructions reference the base horse pattern directly, so it’s worth having both patterns handy.
Can I use different colors instead of black and white?
Of course! The two-color striping technique works with any color combination — try brown and cream for a different animal-print look, or bright colors for a more whimsical version.
Why do I need to leave the unused color yarn uncut?
Carrying the color up the back of the work (instead of cutting and rejoining each time) saves you from weaving in dozens of ends, and keeps the color changes lining up neatly round after round.
My mane won’t stand up — what do I do?
This is normal with some yarns. A light coat of PVA glue on each strand, left to dry completely, will stiffen the mane so it stands upright on its own.
How long does this pattern take?
Because of the frequent color changes, the zebra takes a bit longer than a single-color amigurumi — most makers spend 6–9 hours total between the body and the mane/tail.
Ready to Make Your Own Zebra?
I’d love to see your finished zebras! Tag me or share your makes online — happy crocheting, and may all your stitches be easy! 🦓🖤